Posts

Showing posts from February 24, 2013

Water Color Art Brush Tutorial

Image
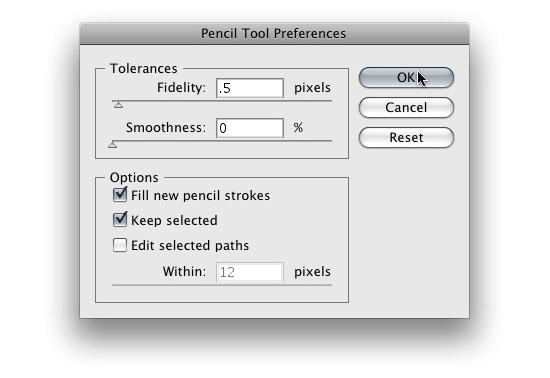
You might be saying “  Doesn't  Illustrator already supply you with some watercolor brushes?” You are right, but the brushes we are going to create have soft edges that blend well together, making them look more like watercolor brushes. To start, you will need to set the some of the Pencil Tool’s setting. Double-click on the Pencil Tool(n) in the Tools Panel to bring up the Pencil Tool Preferences dialog. In this dialog, you want the Fidelity to be .5 pixels. S tart drawing a brush stroke shape with the Pencil Tool (n), around a height of .25 inches and a length of 2 inches. It does not have to be exact, just rough dimensions for your first brush. Make sure to create some rough edges in the brush, this really helps the “bleeding” effect you get with watercolors. Also, make sure to close the path for the brush shape you just created. An easily way to close the path is to hold down Option / Alt right before you are done drawing.  Fill the shape with white and no stroke

3 - D Flower Pot

Image
Step 1 Make sure you have no fill color. Choose a color for your stroke color. The color you choose for the stroke color will become the color for your flower pot. I chose a gray color. Using the Pen Tool, we’re going to draw the right side of the flower pot. Let’s begin with drawing the top part: We need to convert the second point to an anchor. This is easily done just by clicking the point again. You’ll notice that the handle that was pointing diagonally downward is now gone: Step 2 Let’s continue by drawing the middle part of the flower pot: Again, we need to convert this point to an anchor. This is easily done just by clicking the point again. You’ll notice that the handle that was pointing diagonally downward is now gone: Step 3 Now let’s finish by drawing the bottom part of the flower pot: Step 4 Now that we have the right side of the flower pot drawn out, we can use the 3D Revolve effect to create the 3D flower pot! With t

Create a Pen

Image
Step 1 Open a new document and grab the Pen Tool (P). Create a rectangle shape as shown below, and then fill it with a Linear Gradient. To do this, open the Gradient panel (Command + F9), select Type: Linear. For the first Stop Color Slider apply color R=49, G=57, and B=59. For the second one R=76, G=93, and B=103. Step 2 Copy the shape you just created using Command + C followed by Command + B under it. Move the copy a few pixels upwards and change the Fill color to: R=153, G=153, and B=153. Step 3 Now select the two shapes and go to Object > Blend > Blend Options. Now in the opening window, set Spacing to Specified, Steps to 10, and click OK. Then go to Object > Blend > Make and straight after that go to Object > Expand Appearance. Step 4 Apply the same actions to the left half of the box. Fill it with the same Linear Gradient used in Step 1. Step 5 Copy the last created shape using Command + C foll